photography

How to Master Headshot Photography

Headshots play an important role in helping models, actors and other entertainment professionals land gigs. Master the headshot as a photographer and you’ll have lots of happy clients.

To the amateur or non-photographer, the headshot may seem like an easy shot to capture (just crop the person’s face, right?). But, of course, there’s an art to doing it well.

While headshots can be done many ways, the following guide is for traditional headshots taken in a studio on a white background, though many of the tips can be applied to outdoor sessions and other settings. It follows industry standards and will work for most model, actor and corporate headshot photos. Once learned, you’ll be able to easily replicate the process.

SETUP

Two diffused lights, one on each side, should give you a nice, natural look. Our typical setup at Fairway is one large and one medium softbox angled towards the subject. You want to discourage shadows and harsh lighting. For your camera, avoid wide angle lenses and opt for something that will slim your subject’s face.

If you have the equipment to shoot tethered, this can work really well for headshot sessions. When your subject sees their image appear on the screen in real-time, they’ll be able to see what needs to be changed and make their own adjustments throughout the shoot.

POSING

Make sure your subject isn’t too close to the background as to create shadows. You can have them turn their body 45 degrees from the camera, with their face straight towards the camera. Many people will be more comfortable sitting down, so have a stool handy.

Guide your subject and ask them to make small adjustments throughout the shoot. Ask them to smile, tilt their head, pull their shoulders back, etc. Get a variety of shots and don’t be afraid to make specific requests.

CAPTURING THE SHOT

The two most important things to keep in mind are framing and eye contact.

In general, you’ll want to crop in close to the head, leaving just a bit of room between the top of the head and frame. Shoot above the chest but don’t lose the neck and shoulders, or you’ll end up with a floating head. Shooting too far down or below the chest can also make for awkward framing and may distract from the face.

When in doubt, use the Rule of Thirds to compose your image. If you’re cropping in close, try aligning the eyes with the third line of your imaginary grid. (Here’s some info on how to use the Rule of Thirds.)

The eyes are the most important part of a headshot, so make sure that they are in focus (using focal lock) and that your subject is looking directly at the camera.

Though your images can of course be cropped in post-editing, try to crop in camera. In other words, take the photo as you intend it to appear in the final version. It’s more professional and will simplify things for both you and your client, as you won’t have to make mental re-calibrations as you’re looking through the photos. Your client will be able to quickly tell if they got the shot they’re looking for.

The crop should remain consistent throughout. Your subject will be moving as you scroll through the photos, but their head shouldn’t jump all over the frame. It should feel more like a flip book.

WORKING WITH YOUR SUBJECT

Talk to your client before your session, whether on the photo or in person, and let them know what to expect. Find out what the headshots will be used for, advise them on what to wear (more on that below), and find out if they have any specific goals for their session. Some people will be nervous about having their photo taken, but a quick conversation that demystifies the process should help.

Keep talking throughout your shoot, guiding posing and expression, making conversation, and reassuring your client that you’re getting great shots. Long silences will be uncomfortable and will not produce great photos! Keep things light and relaxed.

CLOTHING

Solid, neutral colors generally work best for headshots. Remember that the focus should be on the face, so you’ll want to avoid distracting clothing and accessories. You can tell your client to aim for a simple, professional look that they’re comfortable in.

Specific how many “looks,” or outfit changes, are included with your rate. A corporate headshot session might include one formal look (a blazer, button-up or blouse) and one casual look. You can also play with layers — for example, taking a few photos without the blazer.

Still have questions? Comments? Let us know!
6 Posing Tips for Portrait Photography

1. Pose the hair.

If your subject has long hair, help them pose it. Avoid letting the hair sit on the shoulders — it doesn’t photograph well. Instead, have them position their hair so that it’s:

a) all behind the shoulders
b) all in front of the shoulders, evenly on both sides
c) all in front of one shoulder (try both sides; one will look better than the other)

Make adjustments throughout your shoot and see what works best.

2. Don’t shoot your subject head-on.

Have them turn slightly to the side, about a 3/4-turn away from the camera, for a slimmer look. If your subject faces the camera directly, the shoulders can look especially wide, resulting in your subject appearing wider than they actually are.

3. Chin down and forward.

People have a natural tendency to lean backwards in photos, resulting in an unflattering portrait — you may see up their nose, get a double-chin, and their eyes may appear partially closed. To counteract this, direct your subject to bring their chin down and forward.

4. “If it bends, bend it.”

Follow this mantra from photographer Deanna McCollum. Encourage your model to create a soft bend in their elbows, fingers. Have them bend their front knee, or tilt their head slightly.

This helps add visual interest to your photos with diagonal lines. If everything in your photo is strictly horizontal, your subject will look stiff and unrelaxed.

5. Shift their weight.

Have your subject put their weight on their back foot. They’ll look more relaxed, and it will also help some of the tips mentioned above fall into place naturally: they’ll face slightly away from the camera, and they’ll typically place their hand on their hip.

6. Communicate!

Give lots of direction throughout your shoot. Keep your subject moving. They’ll feel more comfortable and relaxed.

When you find a pose that’s working, capture it at different angles and then have your model make small adjustments (hand in pocket, change where they’re looking, fix their hair, etc.) until it flows naturally into a new pose.

How to Use Focal Lock for Precise Focus

Use focal lock to ensure the right parts of your photo are in focus.

Your camera’s autofocus tool will typically focus on the center of your frame — so it’s not the most reliable tool when your subject is off-center. Focal locking allows you to select the exact spot you want in focus.

Here’s how to do it: 

  1. Pose your subject and compose your shot.

  2. Aim your camera's focal point (it will light up red in your viewfinder) at the exact spot you want to focus on. Press the shutter button down halfway.

  3. Without releasing the shutter, move your camera back to recompose the shot. Then press the button down fully to take your shot.

In your final image, the initial spot where you pressed the shutter halfway will be in focus, even though you moved the camera afterwards.

In addition to being used for off-center subjects, focal locking can be used in standard portraits for sharply focused eyes: frame your subject, pull your camera up to lock the focus on the eyes, then pull the camera back down to position your subject in the center of the frame.

Using Catchlights for Portrait Photography

A catchlight is a reflection or glimmer in the subject’s eye. It helps draw attention to the eyes — arguably your portrait’s most important feature — and brings dimension, depth, and life to a photo. Painters used catchlights in their portraits long before photography was introduced. While it may not be immediately noticeable, catchlights will affect the overall look and feel of your photo.

The size, shape, brightness, and position of a catchlight is determined by the light source used. They may be round or rectangular, depending on your light source. The larger the light source, the larger the catchlight. And if you use more than one light, you may see multiple reflections in your subject’s eyes. There is no “correct” way to use catchlights. However, many photographers prefer what’s most natural-looking — catchlights resembling those created by the sun.

Photographers typically position catchlights at the 10 o’clock or 2 o’clock position in the eyes (again, this mimics light created by the sun). For a natural-looking portrait, you’ll want them to be balanced — so if the left eye is positioned at 10 o’clock, the right eye should be as well. Have your subject face the light and try placing the source slightly above their head, at a 45-degree angle between the subject and camera. You may find a reflector useful for bouncing light into their eyes.

Understanding Shutter Speed

Shutter speed is the length of time that the shutter is open, or the amount of time that the camera’s sensor views your scene. A fast shutter speed freezes action, while a slow shutter speed will create a “motion blur.”  A slow shutter speed may be used to convey a sense of movement — to show water flow, for example, or if you’re photographing a runner, you can use a slow shutter setting to convey a sense of speed.

Shutter speed is measured in seconds, or fractions of a second: 1/1000, 1/500, 1/250, 1/125, 1/60, 1/30, 1/15, 1/8, etc. (the speed typically doubles with each camera setting).

So how do you decide which shutter speed to use? Ask yourself what’s moving in the scene, and how you’d like to capture it — whether you want your image to have a sense of movement, or if you’d like to freeze movement. Movement typically freezes at 1/500th of a second or faster.

If you use a shutter speed slower than 1/60th of a second, you’ll likely need a tripod. It will be difficult to avoid holding your camera steady for this long, and you may get an unintentional blur in your image.

Remember that shutter speed affects exposure, so if you’re working in manual mode and change the shutter speed, you’ll also have to adjust the ISO and aperture to maintain exposure.

You may also choose to work in Shutter Priority Mode, usually indicated by a “Tv” or “S” symbol on your camera. In this semi-manual mode, you select the shutter speed and the camera will automatically select the proper aperture. A fast shutter speed will use a small depth of field (large aperture).

Understanding Aperture

When you press your camera’s shutter release button, a hole opens up to let the image sensor view the scene. This opening is the aperture, which you can adjust to let more or less light hit your camera’s sensor.

Aperture is measured in “f-stops”: f/2.8, f/4, f/5.6, f/8, f/11, f/16, f/22.
Note: the large apertures (larger openings) are given smaller numbers.

The size of the lens opening is doubled, or halved, when you move from one f-stop to the next. The smaller the f-stop number, the larger the opening.

When you change your camera’s aperture, the main thing that will change is the depth of field (DOF), which controls how much of your shot is in focus. With a large depth of field, most of your image will be in focus (a large DOF is typically used for landscape shots). When you use a small depth of field, part of the image will in focus and the rest will be blurry. A shallow depth of field is often used for portraits (it keeps the focus on the subject, rather than the background), macro photography, and creative shots. Smaller f-stop numbers (large apertures) decrease the depth of field, while large f-stop numbers (small apertures) increase the amount of the scene that’s in focus.

If you’re working in your camera’s manual mode, keep in mind that when you change the aperture, you’ll also have to adjust the ISO and shutter speed to maintain exposure. (More on that here.) 

You can also work in Aperture Priority Mode — usually indicated by “A” or “Av” on your camera. In this semi-manual mode, you select the f-stop number and the camera will automatically select the proper shutter speed.

Understanding White Balance

To get the colors in your photos as accurate as possible, it’s helpful to understand your camera’s “white balance.” When properly adjusted, this setting will help your photos look natural.

What You Should Know

Different light sources and lighting conditions produce different colors, or “temperatures,” which is measured in units of Kelvin (K). Fluorescent lighting, for example, adds a bluish tint to photos, while tungsten (bulbs and incandescent lights) can create a yellow cast.

Our eyes naturally adjust to different color temperatures, so you won’t notice any color cast before taking a picture. Our cameras, however, do not: they need us to tell them how to treat different type of light. This is where “white balance” comes in — it balances the color temperature in your images. For cool light (green or blue), you’ll tell the camera to warm things up and for warm light, you’ll tell it to cool down. 

If properly balanced, white objects will not have a blue or yellow tint in your photos.

How to Adjust Your White Balance

Semiautomatic Settings

Most digital cameras have preset white balances. This often produces decent results, although it’s not as accurate as a manual adjustment (see below). The settings most commonly offered are: 

  • Auto: the camera makes its best guess for each individual photo; can be set anywhere from 2,000-10,000 K
  • Daylight: for shooting in direct sunlight; 5,000-5,500 K
  • Shade: for when you're shooting in the shade (no direct sun) with a blue sky; 7,000-7,500 K
  • Cloudy: white sky; 6,000-6,500 K
  • Tungsten: for shooting indoors with incandescent lighting (standard household light bulb); 2,800-3,200 K
  • Fluorescent: typically found in commercial spaces; 3,400-3,800 K
  • Flash: emulates daylight; 5,000-5,500 K

Manual Settings

Most DSLRs allow for manual white balance adjustments. Basically, you tell your camera what white looks like (by holding up a piece of white paper, for example), so it has a point of reference for how other colors should look. This setting can be found in different spots for various camera models — some have a “WB” button on the camera body, while others are found in the “settings” section. (If you’re not sure where to find it, refer to your camera’s manual or Google the camera model.)

Some cameras also have the option to manually set the color temperature in degrees Kelvin.

Understanding Exposure

If you want to venture out of your camera’s auto mode to have more control over your images, one of the most important things to understand is exposure, which determines how light or dark your photo will be.

If your camera doesn’t let in enough light, your photo will underexposed and you won’t see things very well. If you let in too much light, your photo will be overexposed – it’ll be too bright to see details. Your goal is to achieve perfect exposure by balancing three main elements: ISO, aperture, and shutter speed.

  • ISO is the measure of the camera sensor’s light sensitivity.
  • Aperture is the opening in a lens that can be adjusted to let more or less light hit a digital camera’s sensor.
  • Shutter speed is the amount of time, expressed in fractions of a second, that the shutter is open to let light through the aperture.

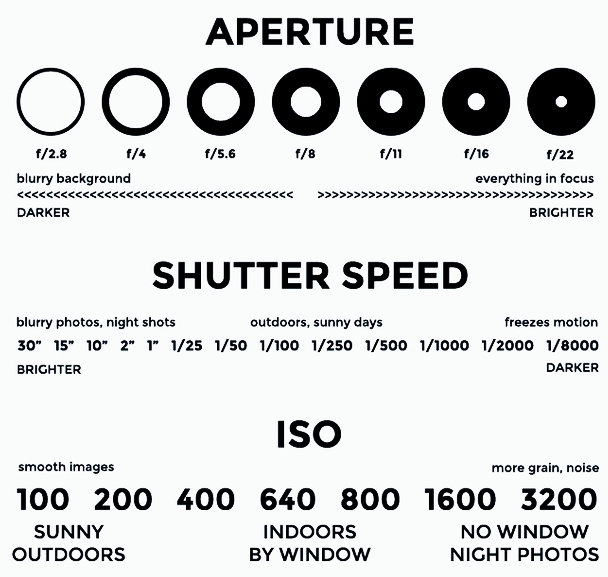
ISO, aperture, and shutter speed all work together. These settings can help you achieve certain creative effects, but you have to keep in mind that if you adjust one setting, the other two will be affected. You’ll have to adjust all three in order to maintain perfect exposure. Refer to the chart below to see how they affect your photos.

 
Exposure cheat sheet. Aperture, shutter speed, and ISO settings for digital photography.
 

Your DSLR should have a light meter to gage your exposure. If your meter is at 0, your photo is perfectly exposed; -2 is underexposed, and +2 is overexposed.

If your pictures are too bright, try upping your shutter speed, increasing your aperture, and/or reducing your ISO. If your pictures are too dark, reduce the shutter speed, decrease your aperture, and/or increase the ISO.